개발스토리
Spring REST Docs 적용 본문
전 포스팅에 이어서 이번에는 spring 프로젝트에 적용한 포스팅을 쓴다.
주요 라이브러리 버전
- spring boot 2.x.x
- gradle 6.x
- junit 5
build.gradle
plugins {
    id 'org.springframework.boot' version '2.x.x'
    id 'io.spring.dependency-management' version '1.0.10.RELEASE'
    id 'java'
    // asciidoc 파일을 변환해서, build 폴더에 복사해주는 플러그인!
    id 'org.asciidoctor.convert' version "1.5.6"
}
asciidoctor {
dependsOn test // gradle build 시 test -> asciidoctor 순으로 수행
}
bootJar {
dependsOn asciidoctor // gradle build 시 asciidoctor 순으로 수행
from("${asciidoctor.outputDir}/html5") { // gradle build 시 ./build/asciidoc/html5/ 에 html 파일생성
into 'static/docs' // html 파일이 jar 안의 /static/docs/ 폴더로 복사됨
}
}dependencies {
...
testImplementation 'org.springframework.restdocs:spring-restdocs-mockmvc'
...
}
테스트 코드
레퍼런스 들을 찾다보면 @AutoConfigureRestDocs를 사용해서 설정을 하는 데 설정이 적용이 안돼서 보니까 junit5에서는 안먹힌다고 한다..!
@ExtendWith(RestDocumentationExtension.class)를 필수로 넣어줘야 한다.
@ExtendWith(RestDocumentationExtension.class)
@WebMvcTest(controllers = HelloController.class)
public class HelloControllerTest {}
- RestDocumentationExtension
위에 이 녀석이 자동으로 빌드 툴에 맞는 output 디렉터리를 설정한다. 나는 gradle을 사용하므로
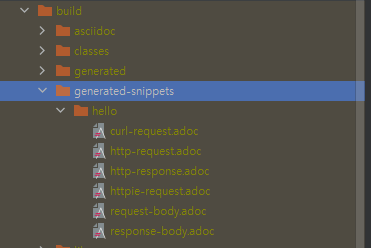
build/generated-snippets 경로에 snippet들이 생성된다.
@BeforeEach
    void setup(WebApplicationContext webApplicationContext, RestDocumentationContextProvider restDocumentation) {
        this.mvc = MockMvcBuilders.webAppContextSetup(webApplicationContext)
                .apply(documentationConfiguration(restDocumentation))
                .apply(springSecurity()).build(); // spring secutiry 쓰고있어서 추가함
    }
테스트 코드를 작성하는 방법은 공식문서를 참조하기 바란다. 다양한 메서드들이 있으므로~
Spring REST Docs
Document RESTful services by combining hand-written documentation with auto-generated snippets produced with Spring MVC Test.
docs.spring.io
테스트에 성공하면 build/generated-snippets에 .adoc 파일들이 생기는 걸 볼 수 있다.

이제 생성된 스니펫들을 사용하면 된다.
gradle의 경우 src/docs/asciidoc/*.adoc 을 생성해준다. 경로는 지켜주어야 한다.

그리고, 문서 기능을 하기 위해 조합해주면 되는데 공식문서 참조바란다. 나는 참고로 마크다운이랑 비슷한 느낌을 받았다.
이 전에 생성한 스니펫들을 사용하려면 include::{snippets}/~경로~/*.adoc[] 이런식으로 사용하면 된다.
인텔리제이에서는 전용 플러그인이 있으니 바로바로 결과를 확인해볼 수 있다.
잘 작성하고
./gradlew build 하면 build/asciidoc/html5 경로에 api.html이 생성된다. 본인이 생성한 .adoc 파일의 이름으로 .html이 생성된다.

그러고 프로젝트 경로로 들어가 cd build/libs로 가서 java -jar *.jar 한다.
그러고 localhost:8080/docs/api.html 접속하면 생성한 문서가 짠! 하고 반겨 줄 것이다.
<느낀 점>
설정이 복잡하다. 그리고 확실히 테스트 코드를 짜는 능력이 있어야 한다. 테스트 코드를 짜지 않으면 사용 자체를 못하기 때문이다. 아직은 설정하고 간단한 api로 적용만 해봤지만 스웨거가 그립달까? 쉽긴 쉬웠는데...
그래도 스스로의 레벨업을 위해서라면 가면 좋은 방향인 것 같다.
+++
나는 gradle 6버전을 썼다,. 7버전을 쓰면 build error가 뜨는 경우가 있다고 한다.
https://gaemi606.tistory.com/entry/Spring-Boot-REST-Docs-%EC%A0%81%EC%9A%A9%ED%95%98%EA%B8%B0
Spring Boot | REST Docs 적용하기 ( + build failed 해결.. )
Spring REST Docs? Asciidoctor를 사용해 RESTful 서비스에 대한 문서를 생성하도록 돕는다. Swagger vs REST Docs Swagger UI Spring REST Docs 실제 코드에 애노테이션을 추가하여 문서가 작성되는 방식 -> 가독..
gaemi606.tistory.com
아래 글 참조하면 될 듯하다. 나도 많이 참조했다.
'Spring & SpringBoot' 카테고리의 다른 글
| [REST docs error] java.lang.IllegalArgumentException: urlTemplate not found. If you are using MockMvc did you use RestDocumentationRequestBuilders to build the request? (1) | 2021.11.16 |
|---|---|
| Spring REST Docs 도입 이유 (0) | 2021.11.11 |
| @Bean, @Component, @Configuration (3) | 2021.08.31 |
| Service와 ServiceImpl (1) | 2021.08.31 |
| HikariCP가 뭘까?! (0) | 2021.08.30 |


